Important: Safety Warning
This page describes home-canning methods from before the causes of botulism were understood. Canning low-acid foods without a pressure canner, as described here, can allow the growth of Clostridium botulinum, whose toxin is among the deadliest known. Follow current USDA home-canning guidelines instead.
This information has been left in for historical purposes but should not be acted upon.
Home › Preserving › Dried Sweet Corn
Dried Sweet Corn
Leave the ears of corn on the stalk until fully ripe. Turn back the husks, tie the ears together, and hang in a clean airy place until thoroughly dried. Grind in the food chopper.
Sift and grade. Use the coarse-ground corn as hominy, the fine-ground in corn bread and puddings.
Canning Meat Stews, Fish Chowder and Soup Prepare the stew, chowder, or soup as for the table, saving time and fuel by making ready two or three times the quantity needed for one meal. When the dish is ready for the table and is boiling in the saucepan, set a sterilized jar near the saucepan. See illustration "Canning Apples with Saucepan" opposite page 28.
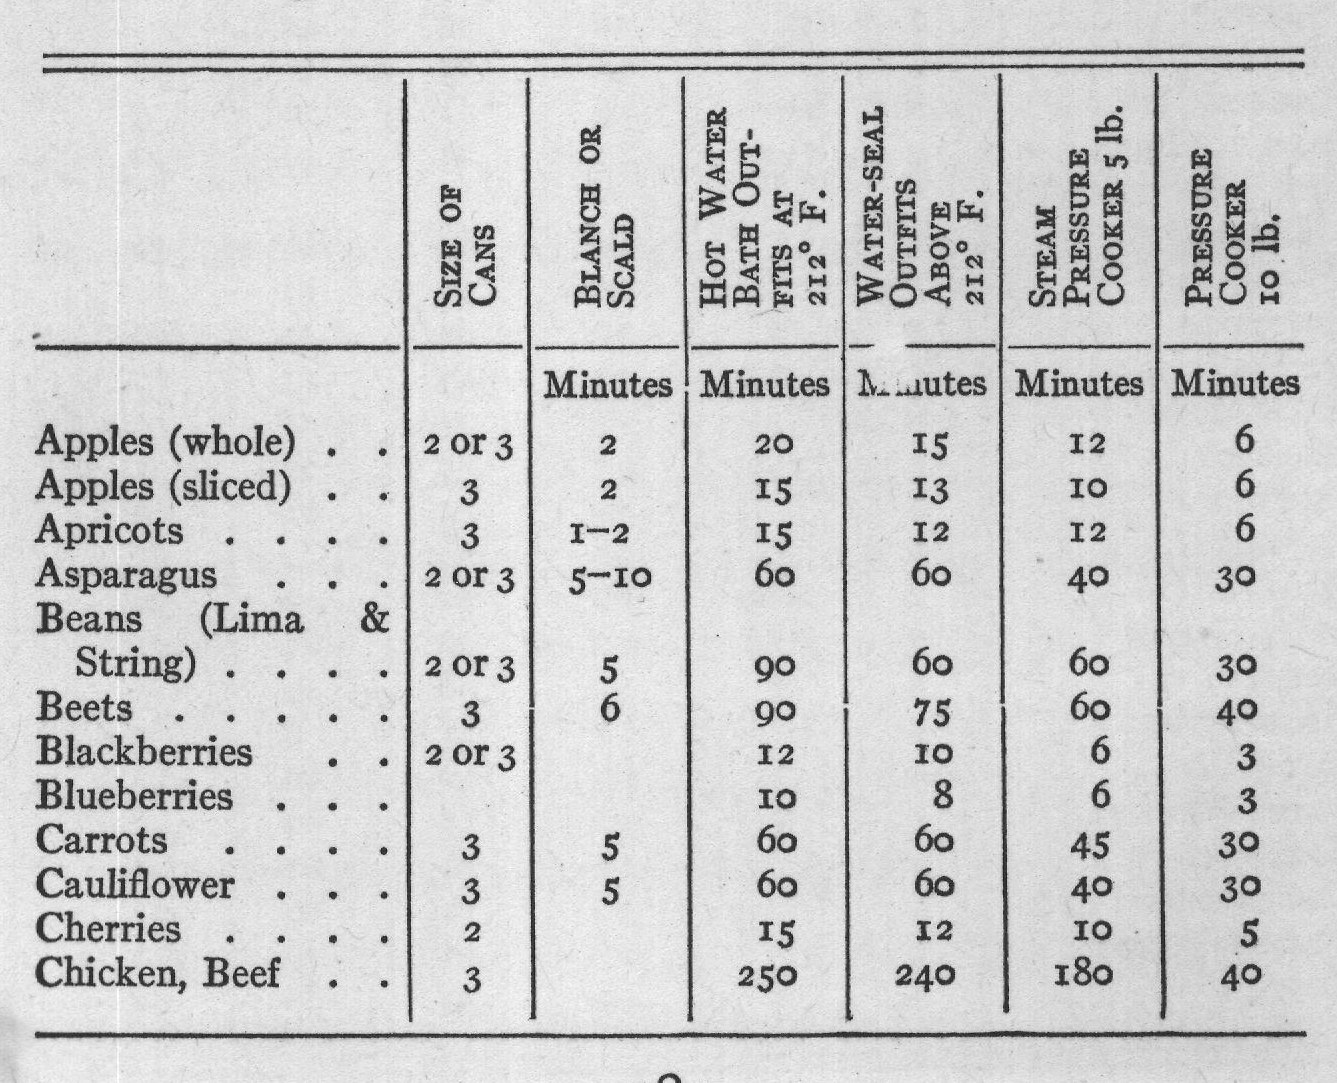
Empty the boiling water from the jar, set the jar back in place on the folded cloth in the dish of hot water and fill it to overflow with the hot food, dip the rubber ring in boiling water and set it in place, take the cover from boiling water, set in place and tighten the jar. When cold, store in a cool dark place, preferably the refrigerator. As somewhat of a guide to the time of cooking fruit and vegetables in canning, the following time-table taken from "Supplement to Farmers' Bulletin No. 521" is given.
Personally, we think better results are secured by testing the fruit and vegetables put up by what is termed the "cold pack" process, before the rubber ring and cover are set in place.
Vegetables taste better if cooked continuously until done; canned string beans, beets, and other vegetables cannot be called a success if longer cooking than reheating is needed to fit them for the table. The time of cooking varies greatly with the season; the variety of vegetable and the soil in which grown. To test one jar in a boiler or canner is but the work of a minute, to then fill all to overflow with boiling water insures less open space in the jars, and last but not least the late adjustment of the rubber rings is a decided advantage. With sterile covers set in place, an extra cooking of ten to thirty minutes is probably not a necessity, but is done simply for the feeling of security which one experiences when lifting jars with contents at the boiling point from the canner, steam cooker, or wash boiler. The adjustment of the last "clamp" on the jar may be done more easily after its removal from the fire, but must be done the instant the jar is set on a firm foundation.
Two separate procedures sit on this page, and they need to be judged separately. The corn-drying method is sound in outline; the open-kettle canning of meat stews, chowder and soup that follows it is not, and is the reason for the caution above.
- The canning instructions are the problemFilling a jar with boiling stew and sealing it is the "open kettle" method. Meat, fish and vegetable soups are low-acid foods, and boiling temperature does not destroy Clostridium botulinum spores. Sealed in an oxygen-free jar and held at room temperature, those spores germinate and produce botulinum toxin, which is odourless and tasteless. No amount of care with sterilised rings and covers changes this.
- Why the author's confidence was misplacedThe passage treats an extra ten to thirty minutes of processing as optional, "done simply for the feeling of security." Low-acid foods require pressure canning at 240F or above for measured times that depend on jar size and food density. Boiling-water processing, at any length, cannot reach that temperature. For soups and stews today, use a current pressure-canning guide, or simply refrigerate or freeze the surplus.
- "Preferably the refrigerator"That instruction is the safest line in the canning section, but a jar of stew that is only refrigerated is not canned food; it is leftovers, and keeps for a few days at most.
- Food chopperA hand-cranked grinder clamped to the table, essentially the same device as the meat grinder of the period. A grain mill gives better control for dried corn; a food processor will bruise more than it cuts.
- "Use the coarse-ground corn as hominy"This is loose period usage. True hominy is corn nixtamalized in an alkaline solution, which loosens the hulls and frees the niacin. What the author means is coarse dried-corn grits, cooked long and slow in salted water.
- Field-drying and mouldCorn left on the stalk and hung in husk relies on dry autumn air. In humid weather it moulds rather than dries, and mouldy corn can carry mycotoxins. A dehydrator or a low oven around 140F is a more reliable modern route to a thoroughly dried product.
- Sift and gradeSifting separates the meal into grits, meal and flour. The finest fraction goes stale fastest because the germ oil is exposed; keep it in the freezer and use it within a few months.
Drying sweet corn on the stalk is one of the oldest North American preservation methods, learned by European settlers from Indigenous farmers who dried both green corn and ripe flint corn for winter storage; Pennsylvania Dutch dried corn remained a regional staple well into the twentieth century. The canning passage that follows belongs to a very different moment. Home canning literature of the 1910s and 1920s drew heavily on the U.S. Department of Agriculture's Farmers' Bulletins, cited here by number, and the field was still arguing over method: open kettle against "cold pack," boiling water against steam pressure. The brisk dismissal of extra processing time as a mere "feeling of security" shows how unsettled the practice was, and how a home cook writing in good faith could recommend something that later USDA research would identify as a leading cause of home-canning botulism.